Help Center
Comprehensive guides to help you get the most out of Vitrin24
Adding a Business
Step-by-step guide to add your business to Vitrin24
Creating Ads & Offers
Learn how to create effective advertisements
Image Requirements
Image specifications and best practices
Location Targeting
Target your audience effectively
Cost Calculator
Understand pricing for ads and offers
Refund Policy
Automatic refunds for rejected content
Image Recommendations
Using high-quality, properly formatted images is crucial for making a great impression on Vitrin24. Here are examples of what works and what doesn't.
Good Example
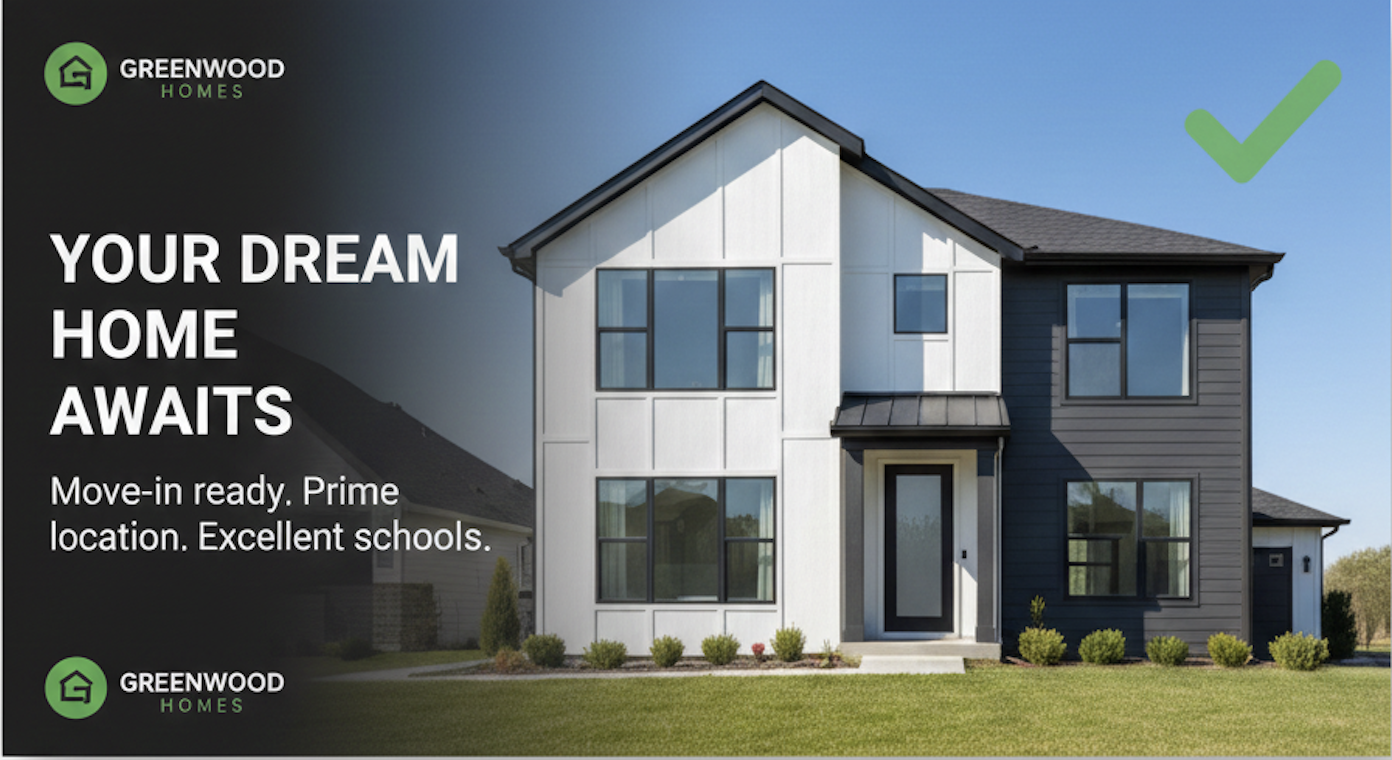
- High resolution and sharp focus
- Proper aspect ratio (3:1 for banners)
- Well-lit with good contrast
- Important content centered
- Professional appearance
- Appropriate file size (under 2MB)
- Clear visual message
Bad Example
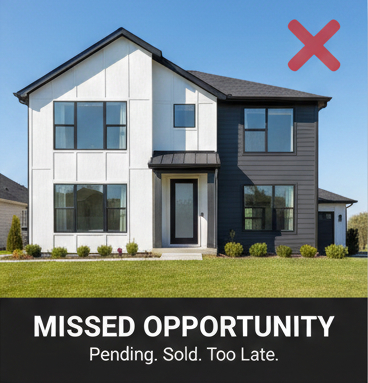
- Low resolution or blurry
- Wrong aspect ratio (gets cropped awkwardly)
- Poor lighting (too dark or overexposed)
- Important content at edges (gets cut off)
- Unprofessional appearance
- File size too large or too small
- Unclear or cluttered composition
Key Takeaways
Banner Images
- Recommended: 1200x400px (3:1 aspect ratio)
- High resolution: 1920x640px
- Max file size: 2MB
- Format: JPG or PNG
- Keep important content centered
Gallery Images
- Recommended: 1200x600px (2:1) or 1920x1080px (16:9)
- Max file size: 2MB per image
- Format: JPG or PNG
- Use consistent aspect ratios
- Show different angles of your business
Adding a Business
Follow these steps to add your business to Vitrin24 and start reaching local customers.
Step 1: Access the Add Business Screen
- Open the Vitrin24 app
- Navigate to the Businesses tab (bottom navigation)
- Tap the + (plus) button in the bottom right corner
- If you're not logged in, you'll be prompted to log in first
Step 2: Fill in Basic Information
Required Fields
- Business Name
- Description
- Category
- Subcategory
- Location (address)
Optional Fields
- Phone Number
- Website
- Social Media links
- Price Range
- Tags
- Services
Step 3: Add Images
Banner Image (Recommended)
Displayed prominently at the top of your business card
- Recommended Size: 1200x400px (3:1 aspect ratio)
- Max File Size: 2MB
- Format: JPG or PNG
Logo Image (Optional)
Your business logo/branding
- Recommended Size: 512x512px (square)
- Max File Size: 2MB
- Format: PNG with transparency preferred
Gallery Images (Optional)
Showcase your business, products, or services
- Recommended Size: 1200x600px (2:1) or 1920x1080px (16:9)
- Max File Size: 2MB per image
- Format: JPG or PNG
- You can add multiple images
Step 4: Set Location Targeting
Location targeting determines where your business will be visible to users.
City Level (Default)
Most specific targeting - visible to users in your city
Province Level
Broader reach - visible to users in your entire province/state
Country Level
Maximum reach - visible to users in your entire country
Global
Worldwide visibility - use only if you serve customers globally
Step 5: Set Business Hours
- Toggle 24 Hours if your business is open 24/7
- Otherwise, set opening and closing times for each day (Monday through Sunday)
- You can mark days as closed
- Format: HH:MM (e.g., 09:00 - 17:00)
Step 6: Review and Submit
- Review all your information
- Make sure all required fields are filled
- Check that images are uploaded correctly
- Tap Submit or Create Business
What Happens Next?
Review Process
- Submission: Your business is submitted with "pending" status
- Admin Review: Our team reviews your business listing
- Approval or Rejection: You'll be notified of the decision
If Approved
- Your business will appear in search results
- It will be visible to users based on your location targeting
- You can edit your business information anytime
If Rejected
- You'll receive a notification with the reason
- You can make changes and resubmit
- No charges apply (business listings are free)
Creating Ads and Offers
Learn how to create effective advertisements and special offers to promote your business.
Creating an Ad
Step 1: Access the Submit Ad Screen
- Open the Vitrin24 app
- Navigate to your Profile or Wallet section
- Tap Submit Ad or Create Ad
- Ensure you have sufficient wallet balance
Step 2: Fill in Ad Information
Required Fields
- Title (catchy and clear)
- Description (optional if using Only Banner mode)
- Duration (1, 7, 14, or 30 days)
- Priority (Low, Medium, High, or Urgent)
Optional Fields
- Click URL (website or landing page)
- Target Location
Step 3: Add Images
- Banner Image: 1200x400px (3:1 aspect ratio), max 2MB
- Regular Images: Up to 2 images, 1200x800px (3:2) or 1920x1080px (16:9), max 2MB each
Step 4: Calculate and Review Cost
The cost calculator shows:
- Base Price (based on duration)
- Priority Multiplier (additional cost for higher priority)
- Final Cost (total amount deducted from wallet)
Important: Credits are deducted immediately upon submission. If rejected, you'll receive a full refund.
Creating an Offer
Step 1: Access the Submit Offer Screen
- Open the Vitrin24 app
- Navigate to your Profile or Wallet section
- Tap Submit Offer or Create Offer
- Note: You must have an approved business to create offers
Step 2: Fill in Offer Information
- Title: Name of your offer
- Description: Details about the offer
- Duration: 3, 7, 14, or 30 days
- Business: Select your business
Image Requirements
Detailed specifications for all images used in Vitrin24.
| Image Type | Recommended Dimensions | Aspect Ratio | Max File Size | Format |
|---|---|---|---|---|
| Banner Image | 1200x400px or 1920x640px | 3:1 | 2MB | JPG, PNG |
| Business Gallery | 1200x600px or 1920x1080px | 2:1 or 16:9 | 2MB | JPG, PNG |
| Logo | 512x512px | 1:1 (square) | 2MB | PNG (transparent) |
| Ad Image | 1200x800px or 1920x1080px | 3:2 or 16:9 | 2MB | JPG, PNG |
Best Practices
Do:
- Use recommended dimensions
- Optimize file sizes (aim for 500KB-1MB)
- Ensure high quality and sharp focus
- Keep important content centered
- Use proper aspect ratios
- Test images on different devices
- Use your own original images
Don't:
- Upload images that are too small (will look pixelated)
- Use wrong aspect ratios (will be cropped awkwardly)
- Upload files larger than 2MB
- Use low-quality, blurry images
- Place important text near edges (may be cropped)
- Upload images with watermarks from other services
- Use copyrighted images without permission
Location Targeting
Location targeting determines where your business or ad will be visible to users.
City Level (Most Specific)
Best for: Local businesses serving a specific area
- Visible only to users in the selected city
- Most targeted approach
- Lower competition in search results
- Best for local services
Province Level (Medium)
Best for: Businesses serving an entire province or state
- Visible to users in the selected province/state
- Broader reach than city level
- Good for regional businesses
Country Level (Broad)
Best for: National businesses or online services
- Visible to users in the selected country
- Maximum reach within a country
- Good for national brands
Global (Broadest)
Best for: International businesses or online services
- Visible to all users worldwide
- Maximum possible reach
- Use only if you truly serve global customers
Refund Policy
Vitrin24 provides automatic refunds when your ads or offers are rejected during the review process.
Automatic Refund Process
- Rejection Notification: You receive a notification about the rejection with the reason
- Refund Processing: Full credit amount is refunded to your wallet immediately
- Wallet Update: Your wallet balance is updated and transaction history shows the refund
- Ready to Use: Credits are available for new submissions immediately
What Gets Refunded
You receive a full refund of:
- The entire credit amount deducted at submission
- Base price + priority multiplier (for ads)
- Duration-based price (for offers)
- Any location-based pricing adjustments
Additional Resources
Business Services
Learn how to add and format business services effectively to help customers find you.
- Format: Services separated by commas
- Use clear, specific names
- Recommended: 5-10 services
- Think like a customer - what would they search for?
Only Banner Mode
Display option that shows only your banner image, requiring users to tap for details.
- Creates maximum visual impact
- Description becomes optional
- Best for visual-first businesses
- Encourages user engagement
Need More Help?
If you have additional questions or need assistance, we're here to help!